上一篇文章介绍了Windows Phone的开发环境和一个简单的Windows Phone程序的演示和结构,这一篇文章要深入一点,介绍Windows Phone的框架结构和程序启动的过程。
一 Windows Phone 框架结构
在进行Windows Phone开发之前有必要了解一下整个全新平台的结构。对于Windows Phone平台来说,区别于之前的Windows Mobile平台最大的区别是他运行环境完全基于.NET框架,他只支持托管代码进行开发。
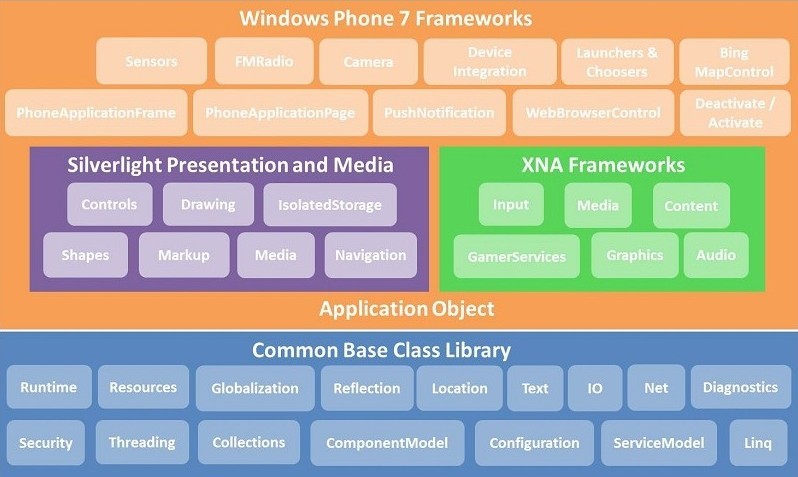
Windows Phone是基于.NET Compact Framework框架,所以精简了很多桌面版的功能。但是还是提供了所需的基本功能。如上图中的最下层的蓝色部分,就是.NET CF提供的BCL类库。而在他的上层就是Application Object。这一层都是基于.NET CF框架。其中包含了两种开发框架:
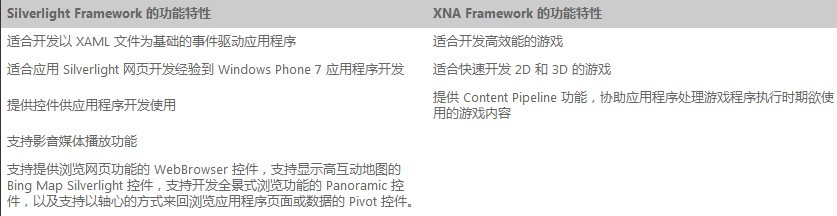
- Silverlight Framework :以 Silverlight Framework 为基础的 Windows Phone 7 应用程序是由一堆的 Page (继承自 PhoneApplicationPage 类别的衍生类别) 组成的,每一个 Page 是一个扩展名为 .XAML 的文件,代表一个操作画面,程序设计师可以利用 Visual Studio 2010 Express for Windows Phone 或是 Expression Blend for Windows Phone 来设计 Page 的用户接口。WP7.0是基于Silverlight3.0,WP7.1则是基于Silverlight4。关于Silverlight for Windows Phone和Silverlight的区别(点击打开)
- XNA Framework:主要的用途在支持开发游戏程序,提供 2D/3D 的动画,音效,及各种游戏相关的功能,协助有志于开发游戏程序的企业或个人发展 Windows Phone、Xbox 360、Zune 播放器、以及 Windows 7 平台的游戏程序。
毕竟移动手机平台还有自己特殊的一部分功能,所以在两个框架的上层Windows Phone特有的一些功能,比如相机,Windows Phone控件,感应器,多点触控屏幕,Launcher,Chooser等等来提供相应功能。
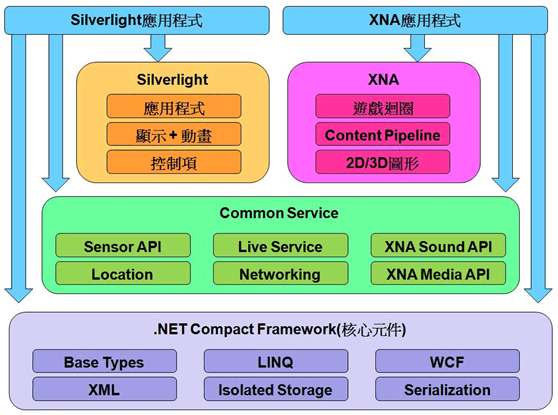
所以具体到实际开发,我们有2套开发框架进行选择,对于大多应用程序我们可以选择Silverlight进行开发,而对于游戏可以选择XNA。但是WP也提供部分功能相互调用的功能。而对以WP7.1来说可以建立一个silverlight和XNA集成的开发环境(点击查看)。
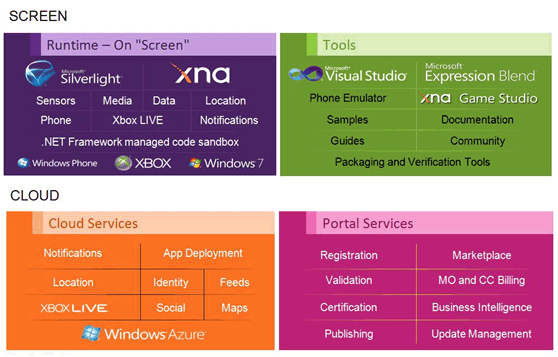
对于Windows Phone开发来说,不仅可以使用.NET CF和silverlight或XNA框架提供的这些功能,还能使用微软基于云服务的一些功能。比如Notification,Social, Location,Map ,Azure等服务。下图显示了Windows Phone上支持的的运行时框架和开发工具。下面的显示提供的运服务以及注册开发者和发布程序。他们组成了对Windows Phone开发的软件支持。
而对于硬件来说,微软统一了硬件平台,目前要求的硬件包括 800 x 480 或 480 x 320 屏幕分辨率,支持多点触控,内建 A-GPS 卫星定位系统,G-Sensor (Accelerometer),电子罗盘传感器,光源传感器,以及不需要直接接触就可以侦测到附近物体的 Proximity Sensor。最少 500 万画素的数字相机,内建 Codec 与多媒体影音播放功能,最少 256MB 的 RAM 与最少 8GB 的闪存,GPU (图形处理器),ARMv7 Cortex/Scorpion 或更佳的处理器,以及 Back、Start、Search 三个硬件按键。目前HTC和三星已经有第一代的WP7手机上市,可以机型和ROM信息可以参见:智机网
关于Windows Phone Plateform的详细介绍参见MSND(点击打开)
二 Windows Phone 7.1 新功能
目前最新版本的系统是Windows Phone 7.1Beta,相对于Windows Phone他有了比较大的改动,弄清楚每一版本的功能,可以更好的了解系统和选择开发的版本。
- 粘贴和复制功能:1月的更新增加了粘贴复制功能
- 执行模型快速切换:实现了新的执行模型,增加了休眠状态,使得应用程序可以快速切换。
- 后台程序代理:增加后台代理功能,可以在程序没有在前台运行的情况下在进行提示,另外还有后台播放和后台下载功能
- 感应器APIs:公开了感应器的API,以便程序可以对硬件进行访问。
- 支持Socket:增加了Socket的支持,可以开发基于TCP和UDP的程序,非常有用。
- 相机数据:增加了对相机原始数据访问的功能
- 推送消息:增加了推送消息的功能,更加稳定
- Silverlight和XNA集成:可以在同一个Page下使用silverlight和XNA进行开发
- 程序配置文件:提供了对程序和游戏进行配置的功能
- WebBrowser :浏览器控件可以支持IE9,并优化了HTML5的表现
- 本地数据库:增加了对数据库的支持,可以使用LINQ to SQL进行操作
- Launchers and Choosers : 提供了新的功能,如Bing Map,Address等
- 全球化和本地化:支持包括中文在内的16种语言
关于程序的兼容性,简单说WP7.0开发的程序可以在OS7.0和7.1上运行,而7.1开放的程序在7.0上可能会失败。具体兼容性问题参见这里
三 Window Phone 程序启动过程
在我们上一篇文章中,我们写了一个简单的Demo程序。程序启动后显示的是MainPage.xaml页面。那么程序是如何成功启动的呢?
1 xap文件
打开程序后,我们对程序进行编译,然后我们可以在/PhoneApp2/Bin/Debug目录下看到名字为PhoneApp.xap文件,这个就是我们程序的包。部署到手机上就能运行。这其实是一个压缩文件,我们可以用7-ZIP来解压。
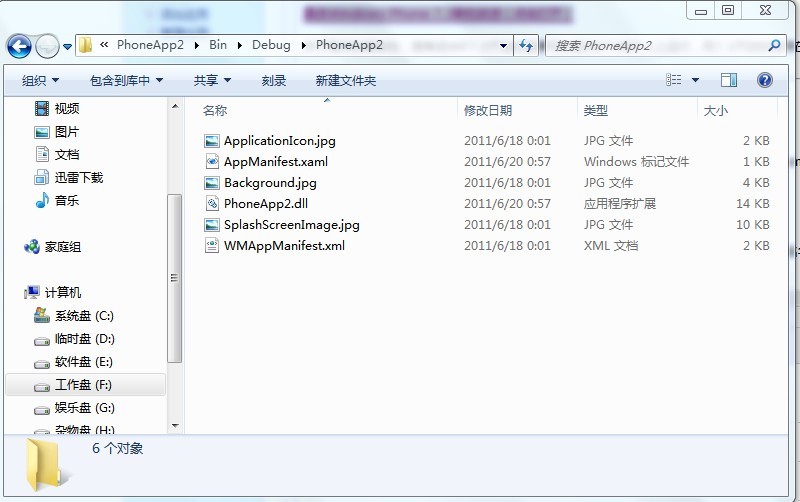
其中包含了程序使用的3个JPG文件,PhoneApp2.dll就是我们程序功能的DLL文件,而AppMainfest.xaml和WMAppMaingest.xml文件则提供了应用程序的一些信息。

上图是一个silverlight的XAP包的结构,WP基于silverlight开发的程序结构是相似的,不过多一个WMAppMaingest.xml文件,用来配置手机相关的一些信息,这个在上一篇有介绍过。首先来看看AppManifest.xaml 文件,它标识打包的程序集和应用程序入口点。
<Deployment xmlns="http://schemas.microsoft.com/client/2007/deployment" xmlns:x="http://schemas.microsoft.com/winfx/2006/xaml" EntryPointAssembly="PhoneApp2" EntryPointType="PhoneApp2.App" RuntimeVersion="4.7.50308.0">
  <Deployment.Parts>
    <AssemblyPart x:Name="PhoneApp2" Source="PhoneApp2.dll" />
  </Deployment.Parts>
</Deployment>
这个和上一篇文章相比,已经自动生成了一些内容。我们来简单看一下:
- EntryPointAssembly : 定义了程序的入口程序集的名字,也就是开始运行时加载的程序集,这里就是我们的PhoneApp2.dll
- EntryPointType : 表示了程序的入口点,这里指定了项目中的App对象
- RuntimeVersion : 表示当前silverlight运行的版本,这里可以看到,WP7.1是基于SL4。
- Deployment.Parts : 此节点中包含了xap包中的程序集列表。
关于xap包结构和此文件结构具体信息,详细可以参考silverlight的应用程序结构。对于WMAppMaingest.xml文件没和编译前没有变化,详细结构上一篇文章中有链接介绍。
2 App.xaml和App.xaml.cs文件
AppMaingest.axml中定义了程序的入口点,其中指定了App对象。通过查看这2个文件,我们发现App.xaml.cs文件中定义了App类,此类继承与Application类,而App.xaml文件的根节点Application指定了x:Class=”PhoneApp2.App”,这个表示把xaml文件中的内容同xaml.cs类中内容合并。这里所有内容编译后会合并到App类中。
当使用 Silverlight 的托管 API 创建应用程序时,必须创建一个从 Application 派生的类。Application 类提供应用程序通常要求的若干服务。它主要表示应用程序代码在 Silverlight 插件生命周期中的入口点。Application类的以下功能:
- 应用程序生存期管理
- 应用程序资源文件加载
- 未经处理的异常处理
- 扩展性
<Application
    x:Class="PhoneApp2.App"
    xmlns="http://schemas.microsoft.com/winfx/2006/xaml/presentation"
    xmlns:x="http://schemas.microsoft.com/winfx/2006/xaml"
    xmlns:phone="clr-namespace:Microsoft.Phone.Controls;assembly=Microsoft.Phone"
    xmlns:shell="clr-namespace:Microsoft.Phone.Shell;assembly=Microsoft.Phone">

    <!--Application Resources-->
    <Application.Resources>
    </Application.Resources>

    <Application.ApplicationLifetimeObjects>
        <!--Required object that handles lifetime events for the application-->
        <shell:PhoneApplicationService
            Launching="Application_Launching" Closing="Application_Closing"
            Activated="Application_Activated" Deactivated="Application_Deactivated"/>
    </Application.ApplicationLifetimeObjects>

</Application>我们看到App.xaml文件中定义了<Application.Resources>节电,这个可以用来定义一些全局的资源别如string,style,笔刷等;<Application.ApplicationLifetimeObjects>则是提供了对Application的扩展性,这里提供了PhoneApplivationService的扩展服务,从名字我们就能知道这个是有关Phone的扩展,因为默认的Silverlight是没有的。这个是位于Micresoft.Phone.dll中,这儿服务提供了4个与手机有关的方法。关于扩展性可以参见silvrlight的扩展服务
public PhoneApplicationFrame RootFrame { get; private set; }

public App()
{
    UnhandledException += Application_UnhandledException;
    InitializeComponent();
    InitializePhoneApplication();
    PhoneApplicationService.Current.UserIdleDetectionMode = IdleDetectionMode.Disabled;
}
以上是App.xaml.cs文件中的代码,首先定义了一个PhoneApplicationFrame属性RootFrame,在构造函数中定义了UnhandledException来处理未处理异常,这是Application的一个功能;InitializeComponent是初始化方法,点击F12导航到App.g.i.cs文件,这个是系统自动根据xaml生成的。
public void InitializeComponent()
{
    if (_contentLoaded)
    {
        return;
    }
    _contentLoaded = true;
    System.Windows.Application.LoadComponent(this, new System.Uri("/PhoneApp2;component/App.xaml", System.UriKind.Relative));
}
这里调用了Application.LoadComponent方法。这个方法的作用是 加载位于指定统一资源标识符 (URI) 处的 XAML 文件,并将其转换为由该 XAML 文件的根元素指定的对象的实例。这里就是生成App类的实例对象。用Reflector看没有代码,我们可以看看Silverlight中的实现:
//部分代码
public static void LoadComponent(object component, Uri resourceLocator)
{
    XcpImports.CheckThread();
    Type componentType = null;
    uint hr = 0;

    if (IsComponentUri(resourceLocator))
    {
        string partName = null;
        string assemblyName = null;
        string assemblyVersion = null;
        string assemblyKey = null;
        if (!QuirksMode.ShouldUseSL3Parser())
        {
            ResourceManagerWrapper.GetAssemblyNameAndPart(resourceLocator, out partName, out assemblyName, out assemblyVersion, out assemblyKey);
        }
        if (componentType == null)
        {
            componentType = component.GetType();
        }
        UnmanagedMemoryStream resourceForUri = ResourceManagerWrapper.GetResourceForUri(resourceLocator, componentType) as UnmanagedMemoryStream;
        if (resourceForUri != null)
        {
            uint length = (uint) resourceForUri.Length;
            hr = XcpImports.Application_LoadComponent(ManagedObjectReference.ConditionalWrap(component), resourceLocator.OriginalString, resourceForUri, length, assemblyName);
            resourceForUri.Close();
        }
    }
    else
    {
        hr = XcpImports.Application_LoadComponent(ManagedObjectReference.ConditionalWrap(component), resourceLocator.OriginalString, null, 0, string.Empty);
    }
}
首先获得了程序集相关的信息,然后获得Uri的资源,最后XcpImports是.NET部分调用core部分的接口,core部分是用C++编写的Core presentation framework,主要功能是XAML parser, UI Core, Inputs, DRM(digital rights management), Media, Deep Zoom等,多数是需直接与具体的操作系统API打交道的功能(可以参考:Silverlight CoreCLR结构浅析)。最终加载的是一个Application_LoadComponentNative的Native方法。
nternal static unsafe uint Application_LoadComponent(IManagedPeerBase componentAsDO, string resourceLocator, UnmanagedMemoryStream stream, uint numBytesToRead, string assemblyString)
{
    if (assemblyString == null)
    {
        assemblyString = string.Empty;
    }
    CheckThread();
    byte* pXamlStr = (stream != null) ? stream.PositionPointer : null;
    uint num = Application_LoadComponentNative(JoltHelper.Context, componentAsDO.NativeObject, (uint) resourceLocator.Length, resourceLocator, numBytesToRead, pXamlStr, (uint) assemblyString.Length, assemblyString);
    GC.KeepAlive(componentAsDO);
    return num;
}

[SecurityCritical, DllImport("agcore", EntryPoint="Application_LoadComponent")]
private static extern unsafe uint Application_LoadComponentNative(IntPtr pContext, IntPtr pComponent, uint cUriStringLength, [MarshalAs(UnmanagedType.LPWStr)] string uriString, uint cXamlStrLength, byte* pXamlStr, uint cAssemblyStrLength, [MarshalAs(UnmanagedType.LPWStr)] string assemblyStr);
这个实例可以通过Application.Current属性获得。从下面的构造函数可以看出,_current被设置为this,zero指针指向了CreateObjectByTypeIndex方法根据nativeTypeIndex创建的App native对象。而在Current中获得对象实例时,先获得这个指针,然后EnsureManagedPeer方法使用Activator.CreateInstance(type) 创建了Application的实例。
internal Application(uint nativeTypeIndex)
{
    _current = this;
    IntPtr zero = IntPtr.Zero;
    zero = XcpImports.CreateObjectByTypeIndex(nativeTypeIndex);
    this.m_nativePtr = new NativeObjectSafeHandle();
    this.m_nativePtr.NativeObject = zero;
    ManagedPeerTable.Add(zero, this);
    this._coreTypeEventHelper = new CoreTypeEventHelper();
    Type type = base.GetType();
    uint isCustomType = 0;
    if (!TypeProxy.IsCoreType(type))
    {
        isCustomType = 1;
    }
    XcpImports.NotifyHasManagedPeer(zero, 11, isCustomType);
    this._hasElevatedPermissions = XcpImports.Application_GetHasElevatedPermissions();
    Deployment current = Deployment.Current;
    this.Starting += new StartupEventHandler(this.Application_Starting);
    this.Started += new EventHandler(this.Application_Started);
    this.Exiting += new EventHandler(this.Application_Exiting);
    this.Exited += new EventHandler(this.Application_Exited);
}

public static Application Current
{
    [SecuritySafeCritical]
    get
    {
        IntPtr ptr;
        if (_current != null)
        {
            return _current;
        }
        XcpImports.Application_GetCurrent(out ptr);
        if (ptr != IntPtr.Zero)
        {
            Application application = (Application) ManagedPeerTable.EnsureManagedPeer(ptr, 0, typeof(Application));
            XcpImports.ReleaseNativeObject(ref ptr);
            return application;
        }
        return null;
    }
}

private static object EnsureManagedPeer(IntPtr unmanagedPointer, int typeIndex, Type type, bool preserveManagedObjectReference)
{
    if (unmanagedPointer == IntPtr.Zero)
    {
        return null;
    }
    object managedPeer = null;
    if (!TryGetManagedPeer(unmanagedPointer, preserveManagedObjectReference, out managedPeer))
    {
        XcpImports.CheckThread();
        if ((typeIndex == 0) && (type == null))
        {
            typeIndex = XcpImports.GetNativeTypeIndex(unmanagedPointer);
        }
        FrameworkCallbacks.Initialize();
        DependencyObject.StaticNativePointer = unmanagedPointer;
        managedPeer = (typeIndex > 0) ? CoreTypes.GetCoreWrapper(typeIndex) : (Activator.CreateInstance(type) as IManagedPeerBase);
        DependencyObject.StaticNativePointer = IntPtr.Zero;
    }
    return managedPeer;
}
以上是Silverlight和Windows Phone都有的下面看看Windows Phone中才有的部分。在构造函数中PhoneApplicationService.Current.UserIdleDetectionMode通过扩展服务设定了是否自动检测空闲,另外文件中包含了Launching,Activated,Deactivated,Closing四个方法,这4个方法是和Windows Phone执行模型有关的,后面会介绍。在构造函数中还有一个InitializePhoneApplication()方法,此方法实现如下。
private void InitializePhoneApplication()
{
    if (phoneApplicationInitialized)
        return;

    RootFrame = new PhoneApplicationFrame();
    RootFrame.Navigated +=   CompleteInitializePhoneApplication;

    RootFrame.NavigationFailed += RootFrame_NavigationFailed;

    phoneApplicationInitialized = true;
}

private void CompleteInitializePhoneApplication(object sender, NavigationEventArgs e)
{
    if (RootVisual != RootFrame)
        RootVisual = RootFrame;

    RootFrame.Navigated -= CompleteInitializePhoneApplication;
}此方法确保只会被执行一次,首先生成了一个PhoneApplicationFrame对象,保存到RootFrame中,然后绑定了Navigated事件。也就是在Frame导航之后执行CompleteInitializePhoneApplication。此方法中把RootFrame设置到RootVisual中。RootVisual用来获取或设置主要应用程序用户界面。只能从代码设置 RootVisual 属性的值一次。
public UIElement RootVisual
{
    get
    {
        return (XcpImports.Application_GetVisualRoot() as UIElement);
    }
    [SecuritySafeCritical]
    set
    {
        XcpImports.CheckThread();
        if ((value == null) || !XcpImports.DependencyObject_IsPointerValid(value))
        {
            throw new InvalidOperationException(Resx.GetString("Application_InvalidRootVisual"));
        }
        XcpImports.Application_SetVisualRoot(value);
        this._rootVisual = value;
    }
}
代码可以看到XcpImports.Application_SetVisualRoot方法,说明最终也还是交给了Core presentation framework去处理,开始显示我们程序的界面。
3 与Silverlight区别
public App()
{
    this.Startup += this.Application_Startup;
    this.Exit += this.Application_Exit;
    this.UnhandledException += this.Application_UnhandledException;

    InitializeComponent();
}

private void Application_Startup(object sender, StartupEventArgs e)
{
    this.RootVisual = new MainPage();
}
以上是Silverlight4程序App类的方法。在Startup中设置了RootVisual为MainPage,那么在启动时就会显示MainPage.xaml页面。我们知道Frame和Page是Silverlight中用来导航的类。而在Windows Phone中则是使用PhoneApplicationFrame和PhoneApplicationPage,其中Frame是容器控制导航,而Page是在Frame中,用来显示用户界面。对于silverlight我们可以把代码修改为类似Windows Phone的代码:
public Frame RootFrame { get; private set; }


private void Application_Startup(object sender, StartupEventArgs e)
{
    RootFrame = new Frame();
    this.RootVisual = RootFrame;
    RootFrame.Navigate(new Uri("/MainPage.xaml", UriKind.Relative));
    //this.RootVisual = new MainPage();
}
我们同样定义一个RootFrame,生成一个Frame对象,设置到RootVisual上,然后通过Frame导航到MainPage.xaml。结果可以正常显示,但是如果我吧Navigate方法注销掉,结果空白,没有任何显示。但是我们看上面Windows Phone中并没有见到Navigate方法,但是还是显示了MainPage.xaml界面。
4 显示第一个界面
为什么没有调用Navigation还是显示了MainPage呢。不要忘记我们还有一个配置文件WMAppMaingest.xml。
<Tasks>
    <DefaultTask  Name ="_default" NavigationPage="MainPage.xaml"/>
</Tasks>
其中Task节点是Application下的子节点,其中有一个属性是NavigationPage,MSDN解释是这里是指定启动时要导航到的Page页面。我们试试把这个修改为Page1.xaml。运行后发现,程序第一个界面显示为Page1.xaml。
private void CompleteInitializePhoneApplication(object sender, NavigationEventArgs e)
{
    if (RootVisual != RootFrame)
        //RootVisual = RootFrame;
        RootVisual = new MainPage();

    RootFrame.Navigated -= CompleteInitializePhoneApplication;
}
然后我们继续做个修改,直接把RootVisual设置为MainPage。运行。。结果显示的是MainPage。所以对于RootVisual来说是设置第一个显示的元素。当我们传递给他的是一个Page或UserControl时,他直接显示此页面的内容;如果传递一个Frame时,如果设置了Source或则调用了Navigation,就会导航到指定的Page显示,如果不指定,Frame是一个容器,没有设置Page就不会显示任何东西,所以会出现上面空白的结果。对于WP7来说,程序从WMAppMaingest.xml中配置得到首页并设置到了Source中。
5 启动界面
在程序启动过程中,会执行Startup和Application_Launching方法。这里可能是一些耗时操作,如果时间超过1S,就推荐使用启动界面,改善用户体验。建议是不在在启动过程中做过多操作,因为启动时间超过10S程序会被直接终止掉。
启动画面图片名为SplashScreenImage.jpg,我们在启动的Startup或者Application_Launching中Thread.sleep(2000), 来模拟启动时的耗时操作。这样启动界面就可以显示。但是很奇怪,我在模拟器上根本不会显示,然后下载了微软的例子Splash Screen Sample,运行后也没有显示出来。不知道什么原因。
在InitializePhoneApplication方法中并没有设置RootVisual,这是为了让启动画面在主界面准备呈现时仍旧有效。我们把RootVisual放到此方法最后也是可行的(和silverlight一样)。不过这里有点不明白,为什么用Navigated事件,是不是启动画面完成后会引发这个事件?
        private void Application_Startup(object sender, StartupEventArgs e)
        {
            //this.RootVisual = new Page1();
            RootFrame = new Frame();
            RootFrame.Navigated += new System.Windows.Navigation.NavigatedEventHandler(RootFrame_Navigated);
            bool ret = RootFrame.Navigate(new Uri("/Page1.xaml", UriKind.Relative));
            //RootFrame.Source = new Uri("/Page1.xaml", UriKind.Relative);
        }

        void RootFrame_Navigated(object sender, System.Windows.Navigation.NavigationEventArgs e)
        {
            RootFrame.Navigated -= RootFrame_Navigated;
            this.RootVisual = RootFrame;
        }
比如我们吧一个silverlight修改成和WP7类似的,在Navigated中才设置VisualRoot,虽然Navigate方法返回了True,但是并没有触发此事件,而程序因为没有设置VisualRoot一直在等带状态没有任何显示。所以对于Windows Phone来说一定是触发了次事件,但是如何触发的目前不清楚。
另外启动时方法执行的顺序是App()–>Startup()–>Application_Launching();
四 总结
这一篇文章大概介绍了Windows Phone的框架结构和7.1版本的一些更新。然后稍微深入的了解了整个程序的启动过程涉及的一些内容以及和Silverligth之间的区别。总的来说就是宿主程序通过AppMainfest.xaml来获取程序的入口点,然后初始化调用Application.LoadComponent方法来生成App对象的实例,接下来初始化手机,定义一个Frame,,通过WMAppMaingest.xml文件获取启动时的Page页面设置到Frame,然后设置到RootVisual来显示此Page。
本文涉及代码较少,在上一篇文章的代码上修改既可。


1楼淫才啊
哦 这样用啊!:)回复:cc_net
回复:jptiancai
点下expand展开代码
楼主的代码有的地方没法显示是什么问题?
显示为下面的形式:
[c-sharp:nogutter:collapse] + expand sourceview plaincopyprint?